I needed to take temperature vs. time measurements for a piece of research equipment in order to determine how much time in advance someone should start prepping before they actually intend to use the equipment. In this case, prepping involves cooling down a metal thermal mass using liquid nitrogen in order to trap moisture in the surrounding air space via condensation.
I could have gone out and bought a more expensive temperature sensing product that may have done what I needed. However, given the simplicity of a thermocouple, combined with the specific list of requirements I had for my particular case, the more cost effective (and more fun) option was to build one myself that would meet my needs. For example, here are some of the requirements that made an inexpensive store-bought thermocouple unsuitable, and also further drove up the price of the more expensive special use options. The space I was measuring in was compact (about the size of a fist) and sealed by a gate valve during cooling, so we couldn’t just probe it while holding a read-out display. Therefore a second requirement was that the system had to be self contained by recording its measurement history so that it could be retrieved later. And third, liquid nitrogen temperatures (boiling point = -196C) are far beyond the range of cheap TMP sensors found in many temperature sensing electronics, so they could not be used.
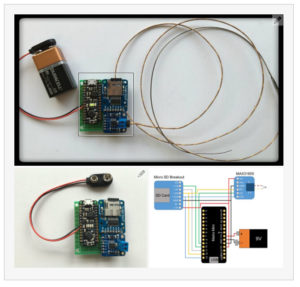
The main benefits of the Data Logging Temperature Probe:
– Temperature measurements from -200C to +1300C with the same device (Note: The probe can get this hot, the electronics cannot)
– Incorporates NIST coefficients and calculations to compensate for non linear voltage response at extreme temperatures (near the measurement limits)
– Compact footprint, measuring under 2″ square and about 3/4″ thick, not including the probe and battery
– Measurement recording interval as fine as 1 second ( < 1 second for advanced users who wish to tweak the code)
– Capable of displaying measurements on a computer in realtime while recording them to the SD card simultaneously
– For a given data collection period, the total duration of data collection and the total number of data points scale with battery and SD card size.
Step 1: Gather Materials
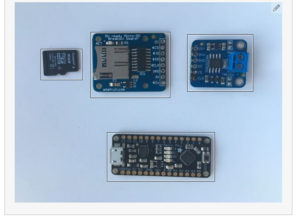
A) Essential Materials I (you will probably need to buy):
– Adafruit Metro Mini 328 – 5V 16MHz
– Thermocouple Amplifier MAX31855 breakout board
– MicroSD card breakout board+
– K-Type Thermocouple – Any K-type thermocouple will work, the one I used is from MSC. You will need to remove the yellow plug housing with a screwdriver
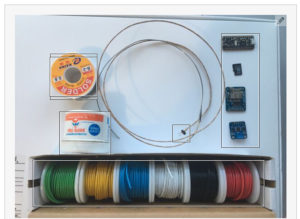
B) Essential Materials II (you will need, but may already own):
– 18-22 Gauge Hookup Wire, Several Colors – Solid core wire recommended, but stranded wire like I used will do the job
– Thin Tin/Lead Solder with Flux Core
– Soldering Iron – This one even comes with some useful tools like a de-soldering pump and some solder to get you started
– 9V Battery Clip and a 9V Battery
– Prototyping Printed Circuit Board aka Perfboard
– MicroSD Card
C) Useful Materials (though not necessary to make this Instructable)
– Wire Cutter/Stripper
– Helping Hands w/ Magnifying Glass
– Solder Removal Copper Wick
– X-Acto Knife and Blades OR Rotary Cutting Tool w/ Abrasive Cutting Disk – For trimming perfboard to size
– Voltmeter w/ Continuity Testing
– Rosin Paste Flux